Introduction to Garlic Herb Braided Bread
Have you ever walked into a kitchen and been immediately swept away by the inviting aroma of freshly baked bread? Baking Garlic Herb Braided Bread is not only about creating something delicious; it’s a delightful journey that engages your senses and fills your home with warmth. Imagine pulling a golden-brown, braided loaf out of the oven, the rich scent of garlic and herbs wafting through your space. It doesn’t just taste good—it makes you feel good.
Why Bake Garlic Herb Braided Bread?
Baking your own bread offers numerous benefits that go beyond the simple act of cooking. First off, it can be a profoundly satisfying experience. There’s something therapeutic about kneading dough, watching it rise, and eventually transforming it into a beautiful loaf. According to recent studies, engaging in kitchen activities can reduce stress levels, making baking not just a culinary endeavor but a form of self-care.
But let’s talk flavors. Garlic and herbs are a match made in culinary heaven, and when paired with warm, soft bread, they create a symphony that your taste buds won’t soon forget. Imagine enjoying a slice with your favorite soup, or serving it as an impressive appetizer at your next gathering. Forget store-bought options! Homemade bread allows you to control the ingredients, making it perfect for those who want to avoid preservatives and other additives.
The versatility of Garlic Herb Braided Bread is another reason to give this recipe a try. You can play with various herbs—rosemary, thyme, or even oregano—to customize it to your liking. If you’re feeling adventurous, consider adding roasted garlic for an even stronger flavor punch. Plus, it pairs beautifully with a robust olive oil for dipping or can be toasted to elevate any dinner spread.
So, what are you waiting for? Grab your apron and let’s dive into the world of baking! Not only will this bread elevate your meals, but it will also become a cherished recipe in your home. If you’re curious about techniques and tips for making bread, resources like King Arthur Baking and The Kitchn offer fantastic insights to get you started.
Ingredients for Garlic Herb Braided Bread
Creating Garlic Herb Braided Bread is not only a rewarding culinary experience, but it’s also a chance to impress friends and family with your baking skills! Here’s what you’ll need to whip up this flavorful delight:
Essential Ingredients
- All-Purpose Flour: About 4 cups for a perfect dough.
- Warm Water: 1 cup, crucial for activating your yeast.
- Active Dry Yeast: 2¼ teaspoons, the magic ingredient that helps the bread rise.
- Sugar: 1 tablespoon, to balance the flavors and feed the yeast.
- Salt: 1 teaspoon, enhancing the overall taste of the bread.
- Olive Oil: 2 tablespoons, for richness and moisture.
- Fresh Garlic: 4 cloves, minced, bringing that wonderful garlic flavor to life.
- Fresh Herbs: A mix like rosemary, thyme, and parsley, chopped finely to elevate your bread’s aroma.
Optional Toppings
- Sesame Seeds: A sprinkle for added crunch and flavor.
- Parmesan Cheese: Grated, for a savory twist.
With these ingredients, you’re on your way to creating a scrumptious Garlic Herb Braided Bread that will leave everyone asking for seconds! Want some tips on kneading or proofing? Check out this comprehensive baking guide for expert advice. Happy baking!
Preparing Garlic Herb Braided Bread
Fresh bread is one of life’s simple pleasures, and there’s something extraordinarily satisfying about creating your own at home. The Garlic Herb Braided Bread recipe combines fragrant herbs, buttery garlic, and the joy of braiding into one delightful loaf. Let’s dive into the preparation process step by step.
Activate the Yeast
The first, and perhaps most crucial, step in making your Garlic Herb Braided Bread is to activate your yeast. You’ll need:
- 1 packet of active dry yeast (about 2 ¼ teaspoons)
- 1 cup of warm water (around 110°F / 43°C)
- 1 tablespoon of sugar
Start by dissolving the sugar in the warm water, and then sprinkle your yeast over the surface. Give it about 5–10 minutes to “bloom.” You’ll know it’s ready when it becomes foamy and bubbly, which indicates that your yeast is alive and kicking!
Mix the Ingredients
Now comes the fun part: mixing everything together! In a large mixing bowl, combine:
- 3 cups all-purpose flour
- 1 teaspoon salt
- 3 tablespoons olive oil
- Fresh herbs (such as rosemary, thyme, or parsley) and 3 cloves of minced garlic
Once the yeast mixture is ready, pour it into the bowl along with the olive oil. Use a wooden spoon or your hands to mix until a shaggy dough forms. At this point, your kitchen should be perfumed with garlic and herbs—how can it get any better?
If you’re thinking about a good source for herb usage in cooking, you might find the U.S. Department of Agriculture’s National Nutrient Database helpful.
Knead the Dough
Time to get your hands dirty! Transfer the dough onto a lightly floured surface and knead it for about 8–10 minutes. You’re aiming for a smooth, elastic consistency. If the dough is sticking to your hands, don’t hesitate to sprinkle a little more flour. Just remember: over-kneading can lead to dense bread, which we definitely want to avoid!
First Rise
After you’ve kneaded the dough, place it in a lightly greased bowl. Cover it with a clean kitchen towel or plastic wrap to trap in warmth. Allow it to rise in a warm, draft-free place until it doubles in size—about 1 hour. This is a good time to prep your workspace or even make a tasty spread for after the bread is baked!
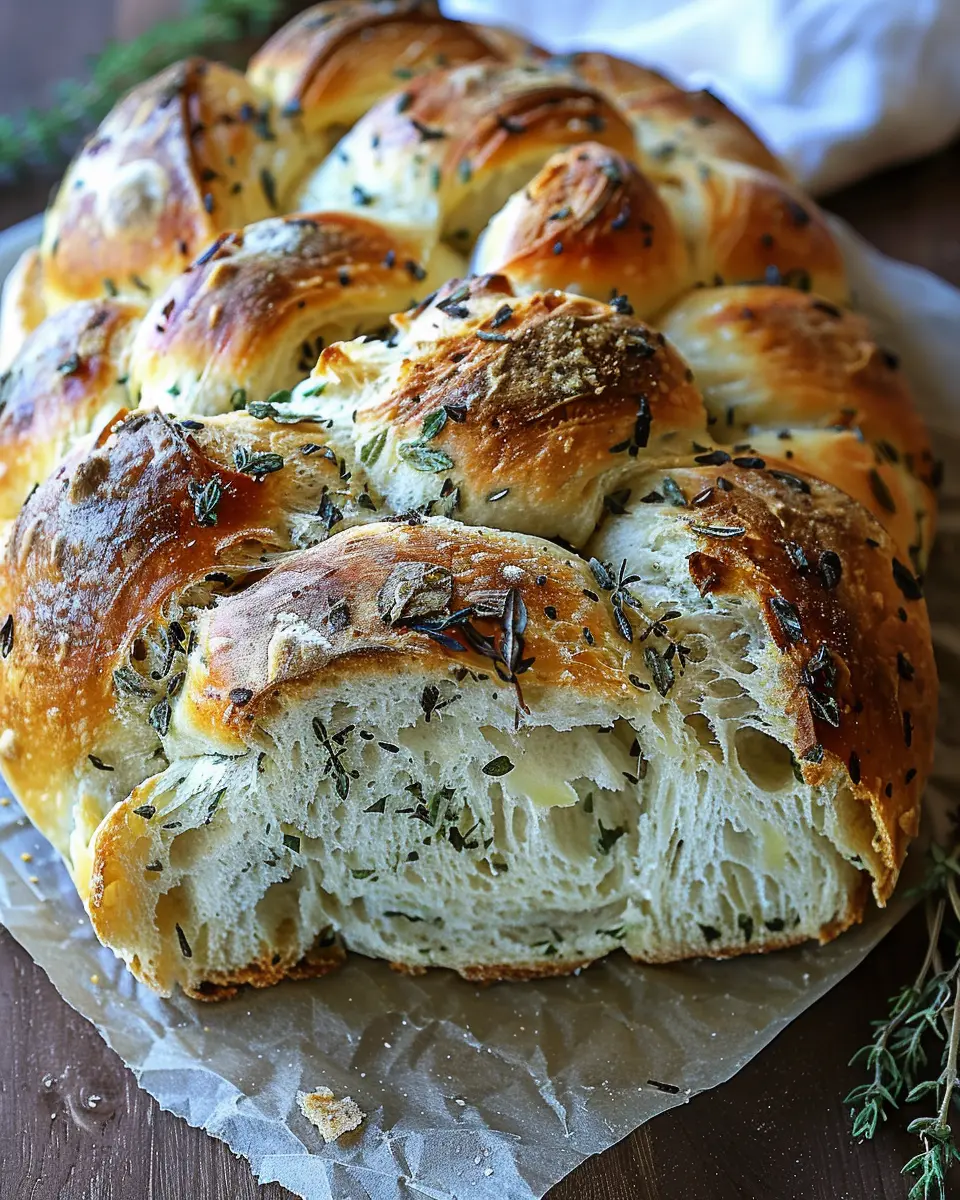
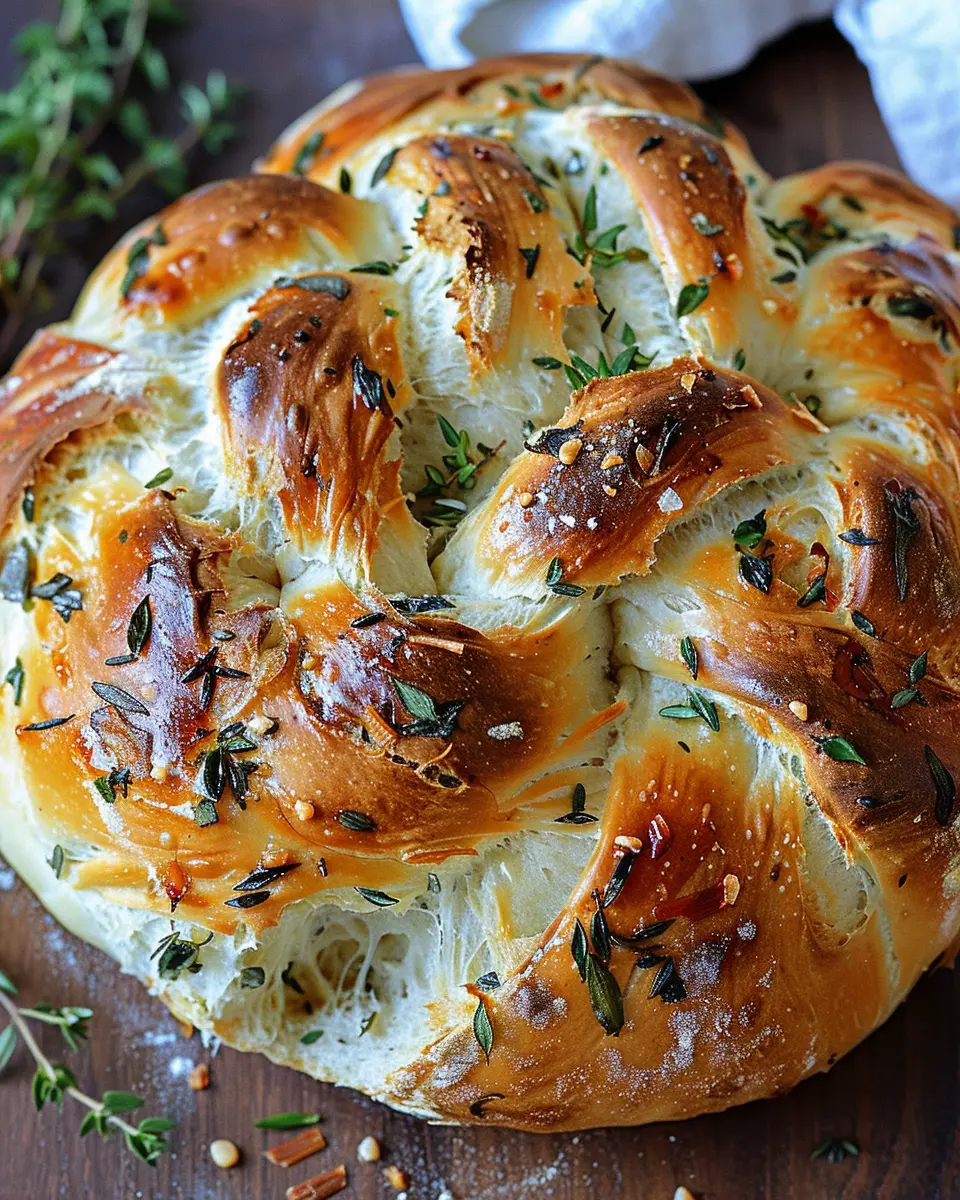
Braid the Dough
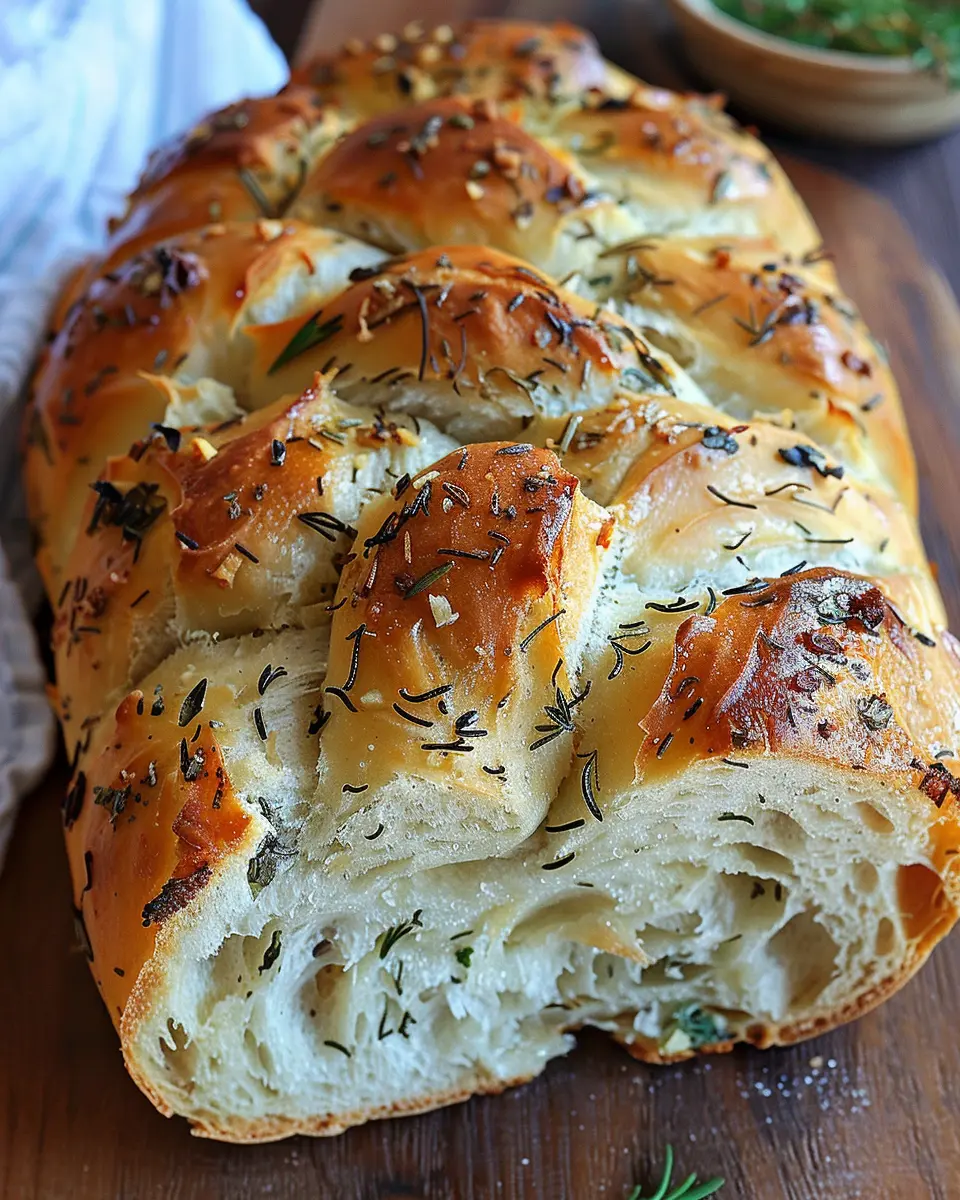
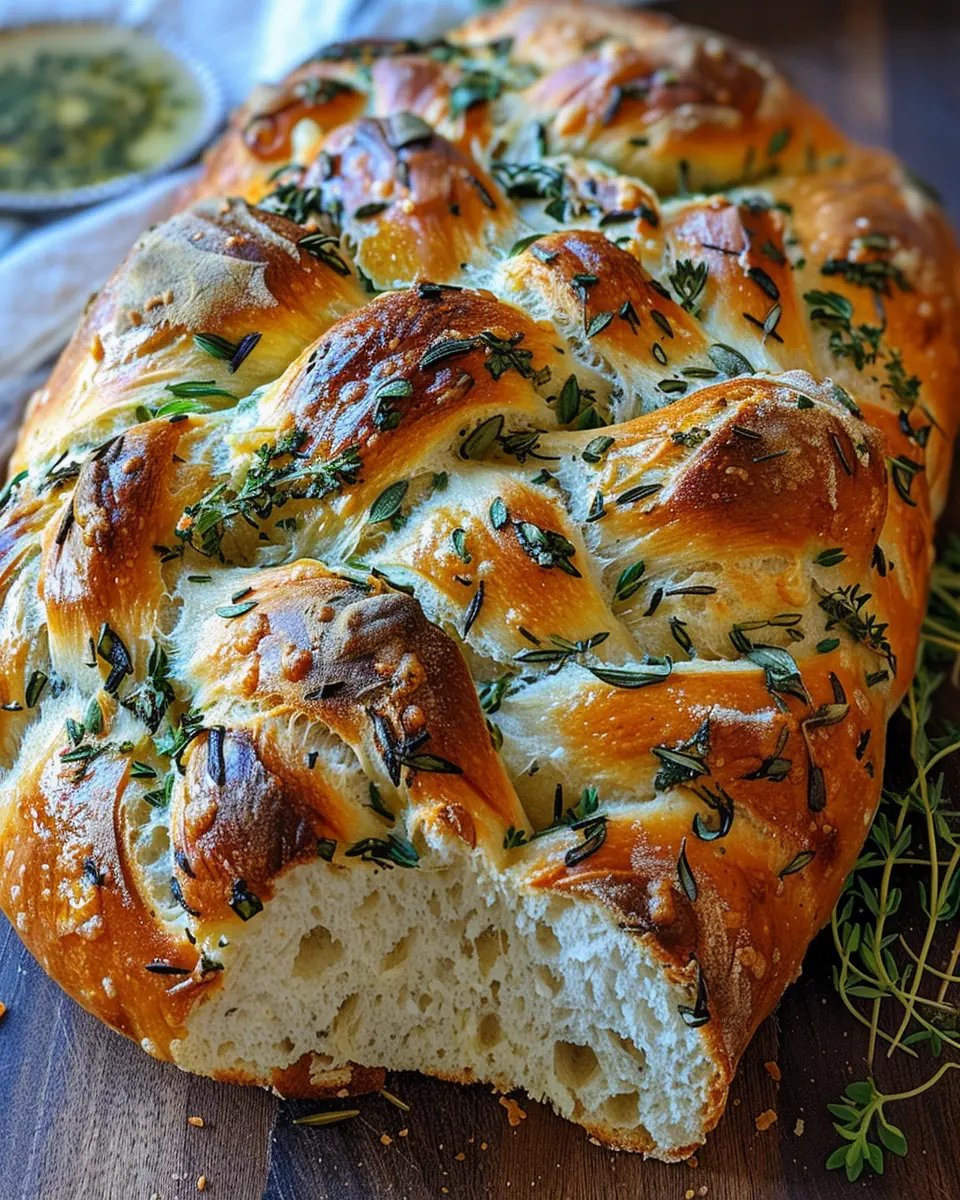
Once your dough has risen, it’s time for the fun part—braiding! Punch down the dough gently to release any air. Divide it into three equal parts, rolling each piece into a long rope. Then, braid them together, tucking the ends under for a neat finish. This dough braid isn’t just easy to make; it’s also visually stunning!
Second Rise
Now, transfer your braided dough to a greased baking sheet lined with parchment paper. Cover it again and let it rise for another 30 minutes. This second rise is essential, as it contributes to the texture and flavor of your Garlic Herb Braided Bread. If you’ve got a warm, sunny spot in your home, it might be the perfect location for this step.
Bake the Bread
Finally, preheat your oven to 375°F (190°C). Brush the top of your dough with a mixture of melted butter and minced garlic for extra flavor, then place your bread in the oven. Bake for about 25–30 minutes, or until golden brown. The aroma will fill your home, leaving you (and anyone nearby) ravenous and eagerly awaiting that first slice.
Once it’s out of the oven, let it cool slightly, and then slice into the warm bread. Serve it up with a buttery spread or your favorite dipping oil.
With a bit of patience and creativity, you’ve created a stunning loaf of Garlic Herb Braided Bread. How will you enjoy yours?
Variations on Garlic Herb Braided Bread
When it comes to Garlic Herb Braided Bread, the base recipe is just the beginning! This delightful bread can be easily transformed to suit various tastes and occasions. Here are a few creative variations to try:
Adding Cheese
Who doesn’t love cheese? Integrating cheese into your Garlic Herb Braided Bread adds a creamy richness. Simply sprinkle shredded mozzarella, parmesan, or even feta in the filling before braiding. For a gourmet touch, try a blend of cheeses. Experiment with different types to find your favorite combo; as cheese expert Nancy Leson notes, “The right cheese can elevate any dish!”
Spicy Garlic Herb Twist
If you’re looking to kick things up a notch, consider a spicy version. Adding crushed red pepper flakes or a hint of sriracha can bring a delightful warmth to your Garlic Herb Braided Bread. For an extra layer of flavor, mix in some finely chopped jalapeños or a dash of your favorite hot sauce into the herb mixture. You’ll love how the heat balances with the savory garlic.
Herb-Infused Options
Herbs offer vast possibilities! Replace or supplement the traditional herbs with your favorites like rosemary, dill, or even a touch of thyme. Fresh herbs provide vibrant flavor while dried herbs are more convenient—whichever you choose, the aromatics will tantalize your senses. Plus, using a mix can create a beautifully complex flavor profile that impresses guests at dinner parties or gatherings.
So go ahead and let your creativity soar with these variations on Garlic Herb Braided Bread! Whether you’re adding cheese, bringing the heat, or playing with herbs, you’re sure to create something special. Happy baking!
Baking Notes for Garlic Herb Braided Bread
Yeast Tips
When it comes to creating the perfect Garlic Herb Braided Bread, yeast is your trusty sidekick. Always check the expiration date on your yeast; using fresh yeast ensures your dough rises properly. If you’re using active dry yeast, activate it by mixing it with warm water (about 110°F) and a bit of sugar. Wait until it bubbles—this means your yeast is alive and ready to work wonders!
Flour Alternatives
Looking for versatility? Consider substituting all-purpose flour with bread flour for a chewier texture. If you’re gluten-sensitive, try almond or oat flour, keeping in mind that you may need to adjust the liquid ratio. Just remember, a little experimentation can lead to delicious results.
Prevent Burning
To prevent burning, consider using a baking stone or placing a shallow pan of water in the oven. This creates steam, helping the Garlic Herb Braided Bread maintain moisture. Also, keep an eye on the baking time; using a thermometer, aim for an internal temperature of about 190°F when it’s done.
Helpful Resources
Check out King Arthur Baking for more yeast tips and expert advice on flour alternatives. Happy baking!
Serving Suggestions for Garlic Herb Braided Bread
Perfect Pairings
When it comes to enjoying your Garlic Herb Braided Bread, consider pairing it with a variety of delicious accompaniments. This bread shines as the perfect side for a warm bowl of homemade soup or a fresh garden salad. Picture diving into a robust tomato bisque or a light spinach salad—the flavors complement each other beautifully.
If you’re hosting a gathering, serve this bread alongside your favorite dips. Pesto, hummus, or a creamy spinach artichoke dip can elevate the whole experience. For proteins, think about featuring slices of chicken ham or turkey bacon wrapped around pieces of the bread for a delightful appetizer.
Additionally, a hearty cheese platter, featuring aged cheddar or goat cheese, pairs exceptionally well. You can find tips on assembling beautiful cheese boards on sites like Cheese Grotto.
Ideal for Gifting
Looking to surprise a friend or loved one? A loaf of Garlic Herb Braided Bread makes for a thoughtful gift. Wrap it in a lovely kitchen towel and pair it with a jar of homemade pesto or a selection of herb-infused olive oils. It’s not just bread; it’s a culinary delight that shows you care.
Consider adding a handwritten note or even a recipe card that includes suggestions for pairing or enjoying the bread. A personal touch like this can turn a simple gift into something truly memorable.
Time Breakdown for Garlic Herb Braided Bread
When you’re ready to dive into the irresistible world of Garlic Herb Braided Bread, you’ll want to plan your time wisely. Here’s a straightforward breakdown to help you on your culinary journey.
Preparation Time
Getting everything ready for your Garlic Herb Braided Bread takes about 20-25 minutes. This includes mixing your ingredients and shaping those delicious braids. Don’t rush—take your time to enjoy the process!
Baking Time
Once the bread is braided, you’ll pop it in the oven for around 25-30 minutes. Watch it closely to ensure a golden-brown crust that’s as delightful to look at as it is to eat.
Total Time
In total, you’re looking at about 55-60 minutes from prep to oven, making this a fantastic recipe for a weekend gathering or a cozy weeknight dinner. So, gather your ingredients and unleash the baker in you!
For more tips on bread-making, check out King Arthur Baking for expert guidance.
Nutritional Facts for Garlic Herb Braided Bread
When you whip up your Garlic Herb Braided Bread, it’s not just about the delicious flavors but also how it fits into your diet. Here’s a quick breakdown of its nutritional content to keep you informed:
Calories
A single slice of Garlic Herb Braided Bread contains approximately 180 calories. That’s not too hefty, making it a great option for a snack or a side with your favorite meal.
Carbohydrates
This bread packs around 30 grams of carbohydrates per slice, which provides you with the energy you need to tackle your day. Perfect for those busy afternoons!
Protein
You’ll get about 5 grams of protein in each slice, adding a bit of substance to your snack or meal. This makes your Garlic Herb Braided Bread a satisfying choice, especially when paired with lean proteins like turkey bacon or chicken ham.
If you want to delve deeper into the health benefits of garlic or herbs, check out Healthline’s take on garlic or the nutritional powerhouses in herbs. Understanding what you eat helps you make better choices—after all, a little knowledge goes a long way!
FAQs about Garlic Herb Braided Bread
Can I use whole wheat flour?
Absolutely! Substituting whole wheat flour for all-purpose flour in your Garlic Herb Braided Bread can add a nutty flavor and increase its nutritional content. Keep in mind that whole wheat flour absorbs more moisture, so you might need to adjust the liquid in your recipe slightly. A good rule of thumb is to use about 1 tablespoon more water for every cup of whole wheat flour. Don’t worry; it will still be deliciously fluffy!
How do I store leftover garlic herb bread?
To keep your Garlic Herb Braided Bread fresh, store it in an airtight container or wrap it tightly in plastic wrap. Keep it at room temperature for up to two days, or you can refrigerate it for a week if you want it to last longer. If you have more than you can eat, consider freezing it! Just slice the bread, wrap individual pieces in foil, and place them in a freezer-safe bag. When you’re ready, thaw and reheat—perfect for a quick snack or side dish.
What dishes pair well with this bread?
The versatility of Garlic Herb Braided Bread allows it to complement a range of meals. Try it alongside:
- Soups: It’s the perfect companion to hearty tomato or vegetable soups.
- Salads: A crisp salad with a light vinaigrette pairs beautifully.
- Proteins: Serve it with roasted chicken, turkey bacon, or grilled beef for a delightful meal.
Each bite of the bread enhances the flavors of your dish, making every meal a bit more special. Plus, it’s a fantastic way to impress guests with minimal effort. For more meal inspiration, check out resources from The Kitchn for great ideas.
Conclusion on Garlic Herb Braided Bread
Creating your own Garlic Herb Braided Bread is more than just a cooking endeavor; it’s an experience that fills your kitchen with warmth and inviting aromas. This delightful bread pairs wonderfully with virtually any dish, elevating everything from soups to chicken salads. Picture the laughter of friends around the table, pulling apart soft, buttery strands of bread infused with garlic and fresh herbs.
To make it memorable, consider experimenting with toppings like extra olive oil or a sprinkle of dried herbs. If you’re feeling adventurous, toss in some Turkey Bacon or Chicken Ham for a hearty twist! For more yummy bread ideas, check out King Arthur Baking for inspiration and tips. Enjoy your baking!
PrintGarlic Herb Braided Bread: The Best Homemade Delight for Your Table
Learn how to make the best Garlic Herb Braided Bread with this easy recipe that will delight your taste buds.
- Prep Time: 15 minutes
- Cook Time: 30 minutes
- Total Time: 1 hour 45 minutes
- Yield: 1 loaf 1x
- Category: Bread
- Method: Baking
- Cuisine: American
- Diet: Vegetarian
Ingredients
- 4 cups all-purpose flour
- 1 tablespoon sugar
- 1 teaspoon salt
- 1 packet active dry yeast
- 1 1/2 cups warm water
- 3 tablespoons olive oil
- 3 cloves garlic, minced
- 2 tablespoons fresh herbs (rosemary, thyme, or parsley)
- 1 egg (for egg wash)
Instructions
- In a large bowl, combine warm water and sugar, then sprinkle yeast on top and let sit for 5 minutes.
- Add olive oil, salt, and flour, then knead until the dough is smooth.
- Let dough rise in a warm place for about 1 hour, or until doubled in size.
- Punch down the dough and divide it into three equal parts.
- Roll each part into a long strand and braid them together.
- Place the braided bread on a baking sheet and let it rise for another 30 minutes.
- Preheat the oven to 375°F (190°C).
- Mix egg with a tablespoon of water and brush over the dough.
- Bake for 25-30 minutes or until golden brown.
Notes
- For a more intense flavor, add extra herbs or use garlic powder in the dough.
- Serve warm with butter for extra richness.
Nutrition
- Serving Size: 1 slice
- Calories: 150
- Sugar: 1g
- Sodium: 200mg
- Fat: 5g
- Saturated Fat: 1g
- Unsaturated Fat: 4g
- Trans Fat: 0g
- Carbohydrates: 24g
- Fiber: 1g
- Protein: 4g
- Cholesterol: 30mg
Keywords: Garlic Herb Braided Bread, homemade bread, easy bread recipe