Introduction to Copycat Raising Cane’s Bread
The appeal of homemade bread
There’s something undeniably inviting about homemade bread. The aroma of yeast and flour baking in your oven brings comfort and warmth, transforming any kitchen into a gathering spot. Most of us have fond memories tied to the fresh taste of homemade goods, from soft rolls at family dinners to warm sandwiches packed for picnics. According to a recent report, homemade bread has seen a resurgence, with a significant 23% increase in interest among young adults over the past few years.
Making your own bread means you can control the ingredients while achieving that delightful, freshly baked flavor that store-bought versions just can’t match. Plus, there’s a level of satisfaction that comes with kneading dough and watching it rise—a small act of culinary magic that makes you feel like a professional baker.
Why choose copycat recipes?
When you think of Raising Cane’s Bread, you might picture the irresistible buttery, slightly sweet, and fluffy texture that pairs so well with their famous chicken. But what if you could replicate that perfection right in your own kitchen? That’s where copycat recipes come into play. With copycat versions, you get the chance to recreate the dishes you love while adding your personal touch.
Here are a few benefits of choosing copycat recipes:
- Cost-effective: Eating out can add up quickly, especially when you’re craving specific flavors. Making your favorite dishes at home can save you money while satisfying that craving.
- Creativity: Copycat recipes offer a chance to experiment. You can tweak ingredients, adjust sweetness, or even swap Chicken Ham for turkey options, modeling the recipe to fit your dietary preferences or taste.
- Skill-building: Trying your hand at these recipes allows you to refine your cooking skills. As you recreate classic dishes like Raising Cane’s Bread, you’ll gain confidence in the kitchen.
For more insights on perfecting homemade bread, you might want to check out resources from King Arthur Baking or America’s Test Kitchen. Both offer valuable tips and tricks that can elevate any bread-making adventure!
In the upcoming sections, we will dive into the actual recipe, and you’ll soon be enjoying your very own version of Raising Cane’s Bread right from your oven. Get ready to impress friends and family with your baking prowess!
Ingredients for Copycat Raising Cane’s Bread
Creating that delicious, buttery Raising Cane’s Bread experience at home is simpler than you might think. Let’s break down the essential ingredients and the delightful garlic butter you’ll be whipping up to take your bread to the next level.
Essential ingredients for the bread
To craft your Raising Cane’s Bread, here’s what you’ll need:
- All-purpose flour: The base of your bread, giving it that perfect structure.
- Yeast: Ensures your bread rises, adding the airy texture we all love.
- Sugar: Just a bit enhances the flavor and feeds the yeast.
- Salt: Essential for flavor and controlling yeast activity.
- Milk: Adds moisture and richness to the dough.
- Egg: Binds everything together while contributing to the softness.
Looking for more details on alternative flours? Check out this great resource on baking flour varieties.
Making the garlic butter and sauce
Now, let’s talk about the garlic butter that’ll elevate your Raising Cane’s Bread. You’ll need:
- Unsalted butter: A must for that creamy flavor.
- Garlic powder: Gives your butter that unmistakable zing.
- Parsley: Optional, but it adds a fresh color and taste.
Melt the butter and mix in the garlic powder until well combined. Brush this luscious mixture generously over your warm, baked bread. Your taste buds won’t know what hit them!
This combination of readily available ingredients will enable you to recreate the warm comfort of Raising Cane’s Bread in no time. Enjoy!
Preparing Copycat Raising Cane’s Bread
If you’re a fan of Raising Cane’s famous chicken with that delicious, soft bread on the side, then you’ll love making your own copycat Raising Cane’s Bread at home! This recipe provides you with the perfect fluffy, buttery bread to complement any meal or simply enjoy on its own. Let’s break down the process step by step, ensuring you have everything you need to recreate this beloved dish right in your kitchen.
Gather your ingredients
Before diving into the baking process, it’s essential to gather all your ingredients. The key to successful bread lies in having everything ready and within reach.
You’ll need:
- 4 cups all-purpose flour
- 1 ½ teaspoons of salt
- 2 tablespoons sugar
- 2 teaspoons instant yeast
- 1 ½ cups warm water (about 110°F)
- 4 tablespoons unsalted butter (melted)
- Extra melted butter for brushing
Having the right ingredients on hand will set the stage for a successful baking experience. Be sure to check that you have everything ready before starting. You can find some great options for high-quality ingredients here.
Mixing and kneading the dough
Once you’ve gathered all your ingredients, it’s time to mix them together.
- In a large bowl, combine the flour, salt, sugar, and instant yeast.
- Gradually add the warm water and melted butter, mixing until a shaggy dough forms.
- Transfer the dough onto a lightly floured surface and knead it for about 8-10 minutes until smooth and elastic.
Kneading is a crucial step since it activates the gluten, giving the bread its chewy texture. If you have a stand mixer, feel free to use that for kneading—it’ll save you some elbow grease!
The first rise
After kneading, place the dough in a greased bowl, cover it with a damp cloth or plastic wrap, and let it rise in a warm place for about an hour or until it doubles in size.
While you wait, maybe enjoy a quick break with a cup of coffee or browse some recipes on Bon Appétit for inspiration! This is a great time to prep any side dishes you may want to serve with your fresh bread.
Shaping the loaves
Once the dough has risen, it’s time to shape your loaves. Punch down the dough to release any air bubbles and turn it out onto a floured surface.
- Divide the dough into two equal pieces.
- Shape each piece into a loaf, tucking the ends under to create a smooth top.
Place the shaped loaves into a greased loaf pan. Cover them again with a cloth and let them rise for another 30 minutes.
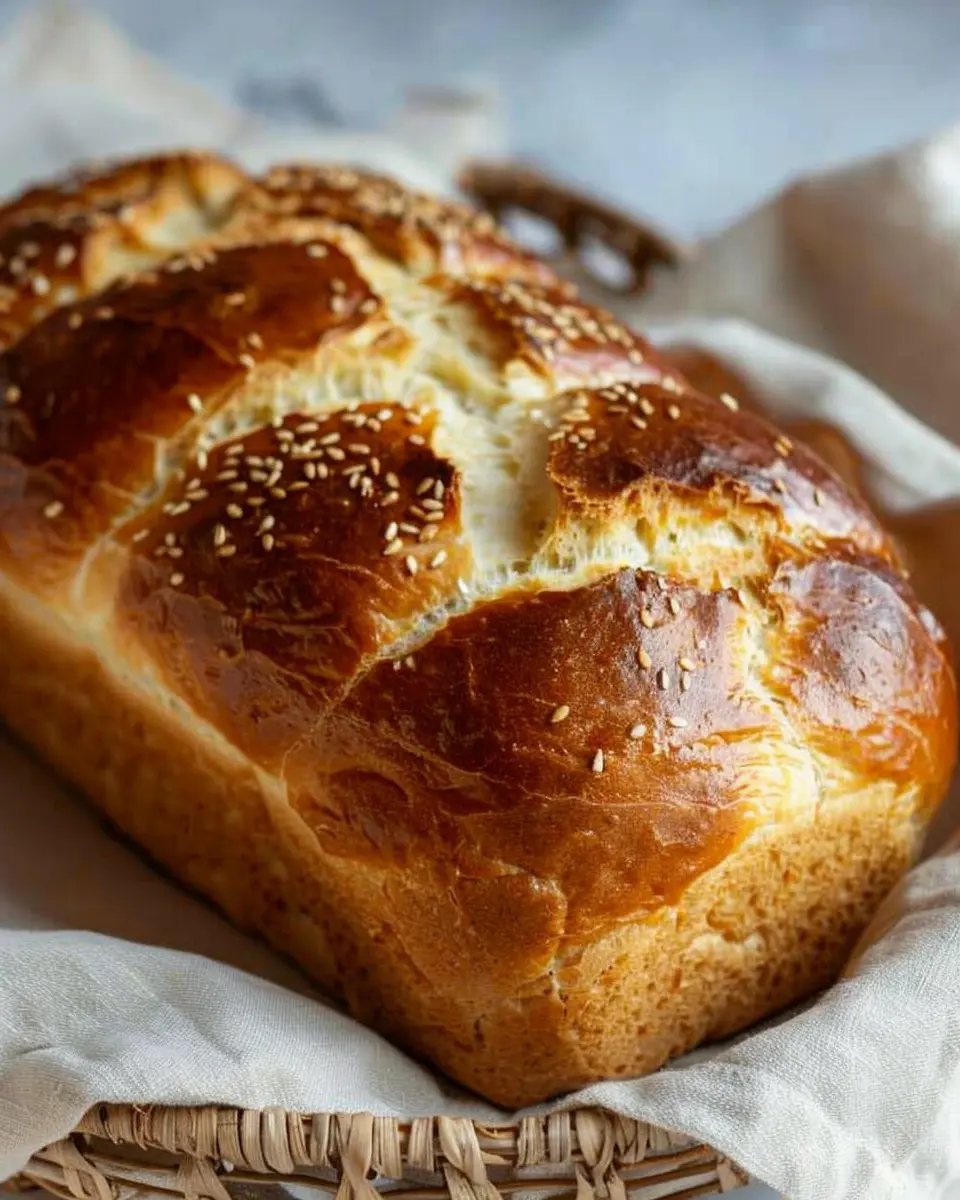
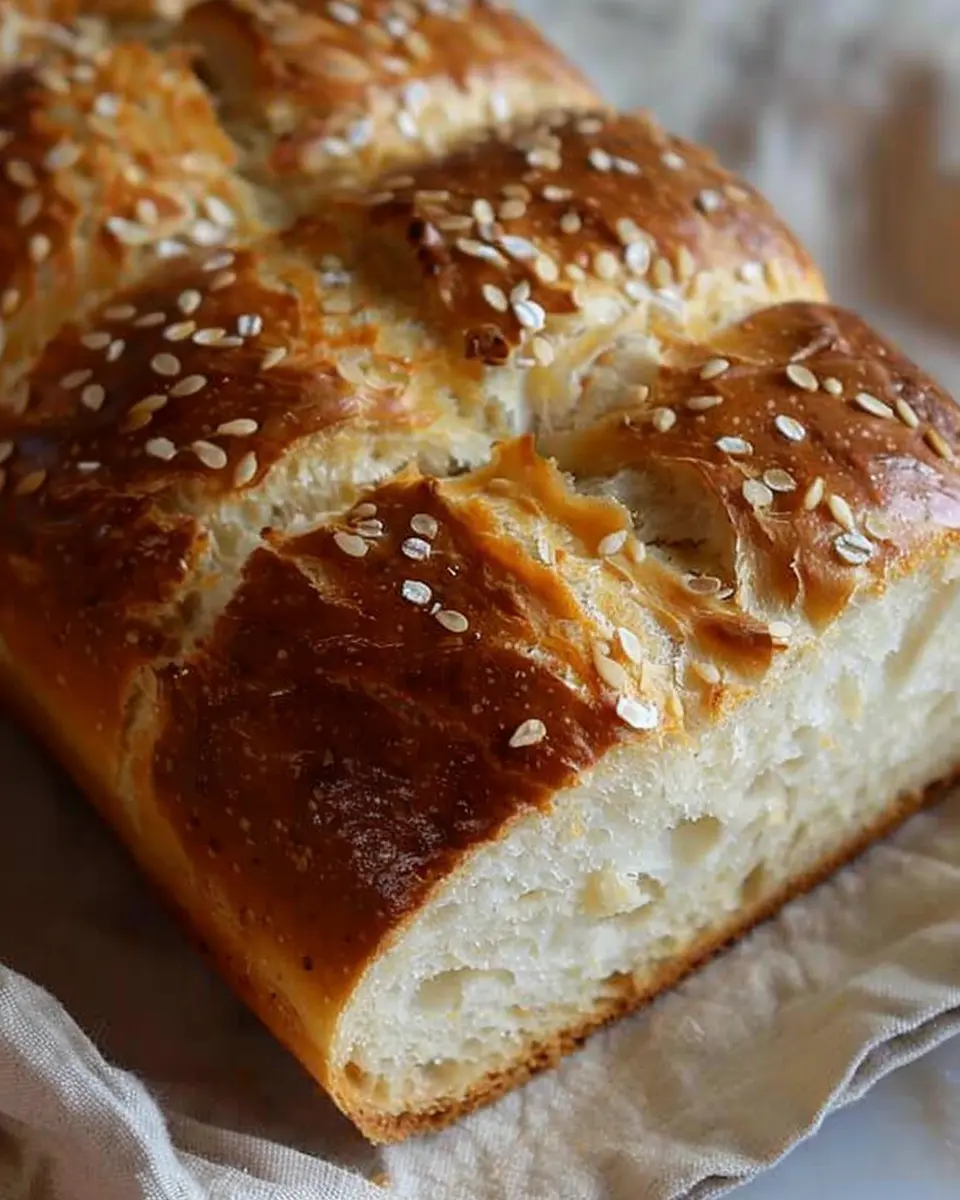
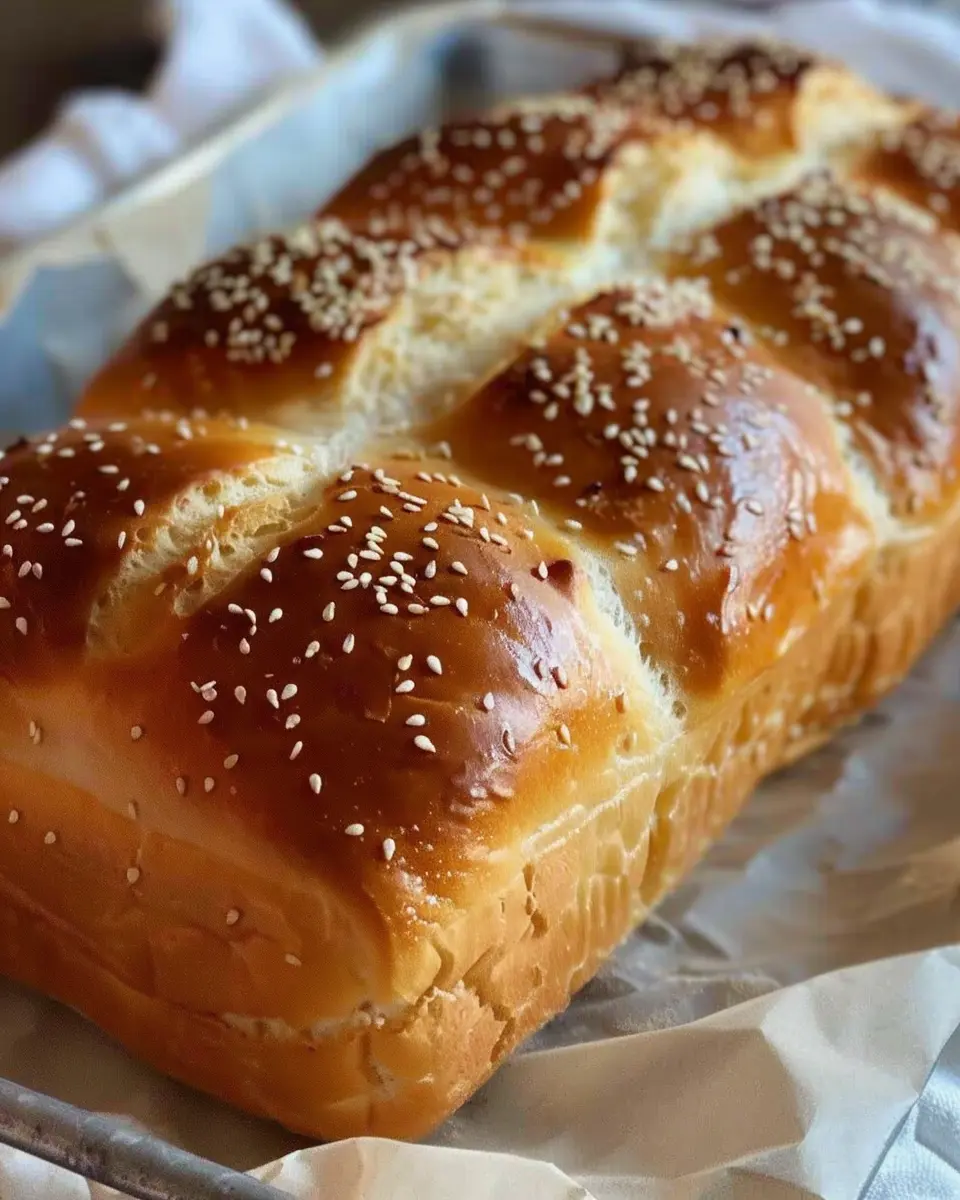
Baking the bread
Preheat your oven to 375°F (190°C). Once the loaves have risen, it’s time to bake!
- Before placing them in the oven, brush the tops with melted butter for that extra golden crust.
- Bake for 25-30 minutes or until the bread is golden brown and sounds hollow when tapped.
The aroma wafting through your kitchen will surely entice everyone nearby!
Making garlic butter and sauce
No Raising Cane’s experience is complete without their signature garlic butter.
For the garlic butter, you’ll need:
- 4 tablespoons unsalted butter (melted)
- 2 cloves garlic (minced)
Mix these ingredients together and brush generously over the warm loaves right after they come out of the oven. Feeling adventurous? You can also whip up a simple dipping sauce with mayonnaise and a hint of lemon juice for a delightful twist.
Making this copycat Raising Cane’s Bread is not only achievable, but it also brings a piece of your favorite restaurant right to your dining table. Enjoy the process, savor each bite, and don’t forget to share your homemade bread adventures!

Variations on Copycat Raising Cane’s Bread
When it comes to making Raising Cane’s Bread, the possibilities are endless! You can easily elevate this simple, buttery delight into something uniquely yours. Here are two delicious variations that are sure to impress your friends and family.
Herb-infused Garlic Bread
Take your love for garlic bread to the next level by infusing it with fresh herbs. Here’s how:
-
Ingredients:
-
1 loaf of bread
-
4 tablespoons of unsalted butter, softened
-
2 cloves of garlic, minced
-
1 tablespoon of mixed fresh herbs (like parsley, basil, and thyme)
-
Instructions:
- Preheat your oven to 375°F (190°C).
- Combine the softened butter, minced garlic, and chopped herbs in a bowl.
- Spread the herb-infused garlic butter generously over your bread.
- Wrap it in foil and bake for about 15 minutes. Unwrap and bake for an additional 5 minutes to crisp up the top.
This version pairs wonderfully with pasta or as an appetizer. For more tips on infusing flavors into your cooking, check out this guide on culinary herbs.
Cheesy Garlic Toast Version
Who doesn’t love a good cheesy toast? This variation adds a gooey, cheesy twist to Raising Cane’s Bread.
-
Ingredients:
-
1 loaf of bread
-
4 tablespoons of unsalted butter, softened
-
1 cup of shredded mozzarella cheese
-
2 cloves of garlic, minced
-
Instructions:
- Preheat your oven to 400°F (200°C).
- Mix the softened butter with minced garlic and spread it over your loaf.
- Top generously with shredded mozzarella cheese.
- Bake for 12-15 minutes until the cheese is bubbly and golden.
This cheesy toast is perfect for snack time or watching a game with friends. Plus, it’s simple enough to whip up at a moment’s notice!
By exploring these variations, you’ll fall in love with Raising Cane’s Bread all over again. Happy baking!
Cooking tips and notes for Copycat Raising Cane’s Bread
Keeping your bread fresh
To make sure your Raising Cane’s Bread stays delicious, store it properly. Keep it in an airtight container or a zip-top bag at room temperature to maintain its fluffy texture. If you plan to enjoy it within a couple of days, this simple method will work wonders. For longer-lasting freshness, consider wrapping the bread in aluminum foil before placing it in the container. This will help keep it moist while preventing it from drying out.
Freezing tips for later use
Freezing your Raising Cane’s Bread is a fantastic option if you want to enjoy that warm, buttery taste at a later date. Slice the bread before freezing, so you can easily grab a piece whenever you’re craving a snack. Wrap each slice tightly in plastic wrap, and then place them in a freezer-safe bag. This method can preserve its flavor for up to three months! When you’re ready to indulge, simply pop the slices in the toaster or microwave.
By following these tips, you’ll always have a warm piece of Raising Cane’s Bread at hand to complement any meal! For even more bread tips, check out this bread storage guide.
Serving suggestions for Copycat Raising Cane’s Bread
Pairing with Raising Cane’s Sauce
One of the simplest and most flavorful ways to enjoy Raising Cane’s Bread is to pair it with their original dipping sauce. The creamy, tangy profile of the sauce complements the soft, buttery bread perfectly. Remember, it’s not just about dipping; consider spreading a little extra sauce on the bread for a delicious twist. If you’re feeling adventurous, try mixing in some garlic or sriracha for a customized flavor boost.
Creative Serving Ideas for Meals
The versatility of Raising Cane’s Bread makes it a great addition to various meals. Here are some ideas to inspire:
- Sandwich Base: Use slices of this bread as a base for a hearty turkey bacon and chicken ham sandwich. The bread’s rich flavor pairs well with your favorite sandwich toppings.
- Mini Sliders: Create bite-sized sliders by stacking your choice of protein—think crispy chicken or beef—between two halves of the bread. Perfect for game day!
- Gourmet Toast: Elevate your brunch by toasting the bread and topping it with smashed avocado, a sprinkle of salt, and a drizzle of olive oil.
With so many delicious ways to serve Raising Cane’s Bread, you’ll find yourself reaching for it again and again! For more serving inspirations, you can check out Food Network for additional recipes.
Time Details for Copycat Raising Cane’s Bread
Preparation Time
Get ready to roll up your sleeves! Preparing your own Raising Cane’s Bread takes about 15 minutes. You’ll need to gather your ingredients and equipment before diving into the mixing and shaping process.
Baking Time
Once your dough is ready and shaped, pop it into the oven for around 25 minutes. This is when the magic happens! You’ll be greeted by that irresistible aroma of freshly baked bread wafting through your kitchen.
Total Time
In just about 40 minutes, you can go from having no bread to enjoying your very own copycat version of Raising Cane’s Bread. It’s a quick and satisfying endeavor that pairs perfectly with your favorite dipping sauce or meal. Interested in elevating your kitchen skills? Check out more advanced baking techniques at King Arthur Baking or explore some delicious serving ideas on Food Network. Enjoy your baking adventure!
Nutritional information for Copycat Raising Cane’s Bread
When indulging in Raising Cane’s Bread, it’s essential to consider the nutritional aspects, especially if you’re trying to balance enjoyment with health. Each slice of this delightful bread typically contains around 150 calories, making it a reasonable choice for a tasty side.
Key Nutrients Breakdown
Here’s a closer look at the key nutrients you’ll find in your Raising Cane’s Bread:
- Carbohydrates: Approximately 28g, providing energy for your day.
- Protein: About 4g, helping with muscle maintenance and repair.
- Fat: Roughly 3g, offering some necessary fats for overall health.
- Fiber: Approximately 1g, aiding in digestion and keeping you full.
For a deeper dive into bread nutrition, consider checking out resources from the American Heart Association or the National Institutes of Health for expert insights into the benefits of whole grains and balanced diets. Enjoy your homemade bread while being mindful of your nutritional needs!
FAQs about Copycat Raising Cane’s Bread
When trying out Raising Cane’s Bread at home, you might have some questions. Let’s tackle some common ones to help you with your baking journey!
Can I use whole wheat flour for this recipe?
Absolutely! While the original recipe calls for all-purpose flour for that soft, fluffy texture, substituting with whole wheat flour is a great way to add a nutty flavor and extra nutrients. Just keep in mind that the dough may require a bit more hydration, so consider adding a splash more liquid to achieve the right consistency.
What are common mistakes to avoid when making bread at home?
Making bread can be a bit finicky, but avoiding some common pitfalls will make your experience smoother:
- Not measuring ingredients accurately: Baking is a science. Use a kitchen scale for precise measurements.
- Ignoring the proofing time: Be patient! Allow your dough to rise fully for the best flavor and texture.
- Skipping the kneading step: Kneading develops gluten, which gives structure to your bread. Aim for at least 10 minutes of kneading.
- Baking at the wrong temperature: Ensure your oven is preheated properly. An oven thermometer can help if you suspect yours might be off.
How do I store leftovers?
If you have leftover Raising Cane’s Bread, store it in an airtight container at room temperature for up to 3 days. For longer storage, consider freezing the bread. Wrap it tightly in plastic wrap, then in aluminum foil, and store it in the freezer. When you’re ready to enjoy it, simply thaw at room temperature or pop it in the toaster for a warm treat!
For more bread-making tips, check out resources like King Arthur Baking or Breadtopia for expert advice! Happy baking!
Conclusion on Copycat Raising Cane’s Bread
Dive into Homemade Happiness
Creating your very own Raising Cane’s Bread is not just about the taste; it’s about the joy of cooking and the satisfaction of homemade food. There’s something truly special about the aroma filling your kitchen and the feeling of accomplishment when those warm, buttery loaves come out of the oven. Why not give it a shot? You can even experiment with different toppings or spreads that suit your palate!
Relishing the Experience
In the end, homemade food offers a unique opportunity to connect with friends, family, and yourself. Whether you’re enjoying it solo or sharing it at a gathering, Raising Cane’s Bread will surely bring smiles to the table. Don’t forget to explore more comfort food ideas that can complement your bread, creating a delightful feast that everyone can enjoy!
PrintRaising Cane’s Bread: Easy Tips for Homemade Deliciousness
Discover how to make Raising Cane’s Bread at home with these easy tips and techniques for delicious results.
- Prep Time: 30 minutes
- Cook Time: 35 minutes
- Total Time: 1 hour 5 minutes
- Yield: 1 loaf 1x
- Category: Bread
- Method: Baking
- Cuisine: American
- Diet: Vegetarian
Ingredients
- 3 cups all-purpose flour
- 1 packet active dry yeast
- 1 tablespoon sugar
- 1 teaspoon salt
- 1 cup warm water
- 2 tablespoons melted butter
Instructions
- In a bowl, mix warm water, sugar, and yeast. Let it sit until foamy.
- In another bowl, combine flour and salt.
- Add the yeast mixture and melted butter to the dry ingredients.
- Knead the dough until smooth and elastic.
- Let the dough rise until doubled in size.
- Shape the dough and place it into a greased loaf pan.
- Allow it to rise again before baking.
- Bake at 350°F (175°C) for 30-35 minutes.
Notes
- For a richer flavor, replace some water with milk.
- Experiment with toppings before baking for added flavor.
Nutrition
- Serving Size: 1 slice
- Calories: 120
- Sugar: 1 g
- Sodium: 200 mg
- Fat: 3 g
- Saturated Fat: 1 g
- Unsaturated Fat: 2 g
- Trans Fat: 0 g
- Carbohydrates: 21 g
- Fiber: 1 g
- Protein: 4 g
- Cholesterol: 5 mg
Keywords: Raising Cane’s Bread, homemade bread, easy bread recipe